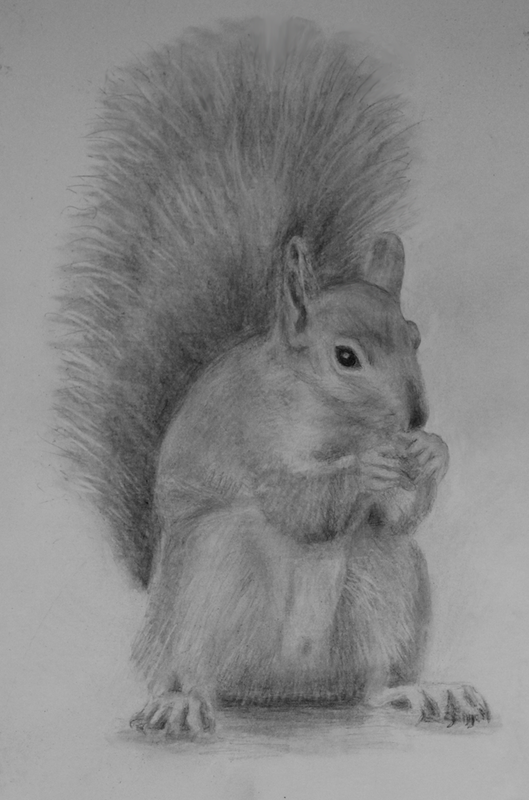
I've learned a lot in my natural history illustration course. We studied flower anatomy and learned how to describe and sketch flowers and leaves. We learned how to give methodical peer reviews. This approach is very helpful when critiquing one' s own art work as well. In the last couple of weeks, we learned about animal anatomy and how to draw animals. I chose to draw a squirrel. Although the course ends tomorrow, the University of Newcastle stated that they plan to offer Drawing Nature, Science and Culture: Natural History Illustration 101 again in 2017.
I used the marbling technique to create these two art works on tightly woven cotton bandanas. First, I immersed the fabric in alum to ensure the paint would adhere to the fabric. Next, I allowed the fabric to dry. After that, I made the size with water and carrageenanan, an extract from seaweed. Carrageenan allows the paint to float and spread. Then, I used toothpicks to swirl the paints to create the marbling design. For this piece I used Jacquard airbrush paints. The moon in the piece started out as a drop of yellow paint that spread out on top of a layer of marbled paint I had already created. When I was happy with the design, I placed the bandana on the size for a few seconds, lifted it off by the corners, and rinsed the bandana to remove the carrageenan and excess paint. When the print was dry, I heat set the paints, so I could wash the bandana. I used Photoshop Elements To create digital prints with the geese. After I scanned the image on the bandanas into the computer, to the design I added layers of geese in silhouette that I had created. Finally, I added borders to the prints. Did you know you can take regionally accredited art courses online? California Community Colleges, for instance, offer many foundation-level art courses fully online. In California, as in many other states, colleges offer art appreciation and art history courses fully online. Yet not many colleges offer studio art courses. You'll be happy to know that five California community colleges do offer studio art courses online. Foothill College has the most online art courses. In 2008, I wanted to take a drawing course online or through correspondence study. I couldn’t find one drawing course offered at a distance at a community college. I searched through books and on the Internet. I checked the California Community College Chancellor’s Office, and no online courses were listed. However, I did discover drawing and design courses at San Francisco City College where I received my AA degree. But the courses were hybrid, meaning, they were not offered fully online. Finally, I decided to check each college, one by one. As a result, I discovered a drawing course at Lassen College. I began the correspondence study course in August and completed it in December. In January 2009, I took an art appreciation course through Lassen College’s correspondence study program. If I had not checked each college one by one, I would have not known this program was available. In the fall of 2009, Foothill College began offering drawing courses online, so I took Drawing 2 that fall. And in the fall of 2011, Foothill College started offering an oil painting course online. I completed the course in December. Foothill College seems to have the most online art courses among the California public Colleges. Besides, several new art courses have been added, and some have been discontinued, at least for now. In addition to Foothill College, American River College, Coastline Community College offer two dimensional design. Pierce College offers an advanced design course, and Cerro Coso College has a drawing course. Lassen College no longer offers a drawing course online. Online courses at California community colleges cost $49 per semester unit for residents. Foothill college runs on a quarter unit system. Therefore, the courses there are $32 per quarter unit. Where ever you take your online art course, be ware that not all courses are offered each semester. So ask the art department about a particular course, or check back when a new schedule is available. If you do an Internet search, you'll undoubtedly find several universities that offer high school online or correspondence programs. The following three universities have courses that are relatively cheap, even for non-residents, and each university offers both online and print-based art courses.
and the print-based courses cost $148. The following courses can be taken by high school students or adults. ART 041 - Art Foundations, Part 1 ART 043 - Art Foundations, Part 2 ART 045 - Drawing ART 051 - Calligraphy ART 059 - Introduction to Commercial Art ART 061 - General Photography Texas Tech University offers Art 1a and Art 1b online for $190 and in print for $215. The following University of Nebraska online art courses cost $250. Add another $35 for the print-based course. Arth003: Elements of Drawing Arth005: Digital and Film Photography Arth015: Appreciating Art Arth017: Exploring Visual Design The important thing to find out is whether a teacher offers feedback on studio art assignments. If a teacher can make a correction to the student's work on an overlay, for instance, it will help the student to revise the assignment. I believe it is superior to written feedback.
If you want to learn how to create effective infographics, check out The Functional Art, a book and course on DVD, by Alberto Cairo. Cairo is a visual journalist and designer, who teaches information graphics and visualization at the University of Miami School of Communications. In the 363-page book, Cairo shows examples of infographics to help explain the planning and execution of infographics and visualization. Cairo also shows poor examples and what can be done to improve them. Early in the book, Cairo uses the following analogy to clarify the purpose of art used in infographics. A journalist might use literary devices in her writing style to serve as tools to help convey information and enhance a reader's subsequent inquiry and discovery. These tools are similar to information visualization used as a tool to augment understanding. The author devotes a chapter to highlight experts in the field that he interviewed for the book. Two of the experts, Juan Velasco and Fernando G. Baptist, created Building Gobekli Tepe at the National Geographic magazine. Another fascinating part of the book describes the brain and how it processes visual information. What surprised me the most was learning that we see abstract representations of persons, places, and things better than realistic representations. The video lessons cover topics, such as principles of design, the process of designing an infographic, components of interactivity, and the importance of designing accurate and attractive infographics with visualization for deeper understanding. In Lesson 3, Cairo describes the process used by experts in the field to create infographics. I would recommend The Functional Art because I have read several books on the subject and none of the other books came close to offering the detailed description, analysis, and details of effective infographics development. If you're looking for something fun and creative, too? Then, consider blueprinting, an alternative photographic process. But you won't be creating an image for the construction or engineering industries. Instead, you'll learn how to use the sun to transform a design into a work of art on fabric. You may wish to design a scarf, t-shirt, or any other garment or fashion accessory. You can also make an art print to frame and display. Kids would also love to do this easy and fun activity. The blueprinting process, or cyanotype, was invented in 1842 by an English astronomer, Sir John Herschel. But it wasn't until the industrial revolution that the process was used widely by architects, builders, and engineers to create drawings. A blueprint used to contain white lines on a blue background. Today the standard blueprint process contains blue lines on a white background. Preparing to Make Blueprints Blueprinting on fabric begins with saturating the fabric with a solution of two chemicals--ammonium ferric citrate and potassium ferricyanide (water soluble iron salts). These two chemicals react to UV light producing the compound Prussian blue. You can also choose to work with pretreated fabric in which case you won't need to mix any chemicals. The treated fabric is safe to use. All you'll need are gloves and perhaps an apron or old clothes and a drop cloth to keep things from being stained. If you work the chemicals in powder form, wear a mask. It is best to use a natural fiber, such as 100% cotton, rayon, or silk. If you use a fabric of cotton and polyester blend, the blue will not be as vivid and may fade with time. Also, before you begin your project, wash the fabric to remove sizing and conditioners, which would interfere with the chemical reaction. Follow these four easy steps to create your blueprint on fabric:
Create a design Select objects to place on your fabric. Some ideas include dried flowers, leaves, ribbons, feathers, or stencil shapes. Place objects on a flat surface in the sun to determine if the objects create unattractive shadows. If so, find flatter objects. Arrange objects on the fabric in different ways until you are satisfied with the design. You may also draw or stamp images on a "write on" transparency sheet, or print a photo negative on an overhead transparency sheet using an inkjet printer. But first you'll need to use photo imaging software to change a scanned or digital photo into a negative. Then, place the transparency on the fabric. You can also take your image to a copy shop and have them print your image on a transparency. Expose treated fabric to the sun or artificial UV light During the summer in the Northern Hemisphere, the best time of day to print your fabric is around noon when the sun is overhead and the sky is clear. At this time, the UV light is most intense and the angle of the sun will help print a crisp picture. If the sun is low in the sky, you'll need to prop up your treated fabric so that it will be perpendicular to the sun. In this way, you can avoid shadows and a fuzzy picture. Also, select a place that is wind-free; any movement will produce a fuzzy picture. When you are ready to begin, place a large piece of plywood or foam board on a table and take the treated fabric out of the lightproof bag. You should be indoors away from the UV light source when you do this. Place the fabric on the board and add the transparency or the objects that will create a design to the fabric. Try to do this quickly. Although you will have a few minutes, the treated fabric will start to change color slowly. Put a piece of glass or acrylic (non-UV coated) on top of the design. This will help maintain close contact between the design and the treated fabric, and movement will be prevented. As a result, light won't be able to expose the covered area that will result in the design. You may also choose to pin the objects to the treated fabric. Note that shadows of the pins will appear on the design. If the acrylic or glass is not at least as large as the fabric, lines will print. Rinse the fabric After 5-15 minutes (depending upon the time of day and year) when your fabric turns dark green, bring the fabric inside and rinse it in a tub of water. Keep rinsing until the water is clear. The non-exposed chemicals will rinse out, creating the image background. If you use white fabric, you'll see the print appear white and blue. If you use fuchsia fabric, the print will be purple and fuchsia. Yellow fabric will produce a green and yellow print. And turquoise will produce a blue-green and turquoise print. If the objects are opaque, the fabric they cover will not change after rinsing. If the objects are transparent or translucent, light will get through, expose those areas to the sun and produce the print. Dry the fabric After thoroughly rinsing the fabric, hang it to dry inside, lay it flat on a towel, or place it in a dryer inside out. If you print on silk, roll the silk to remove excess moisture and then lay it flat on the towel or hang to dry. Care of Your Blueprint When you need to wash the fabric, always select a non- phosphate liquid soap such as Woolite or Dove. It is better to hand wash than machine wash. If you use a detergent with phosphate, your print will fade or contain yellow or brown blotches. If you leave your fabric to dry outside, it will fade over time. If you want to have the fabric dry cleaned, take a swatch to the cleaners for testing. View more blueprints Resources: Blueprints on Fabric http://www.blueprintsonfabric.com/ Hewitt, Barbara. Blueprints on Fabric: Innovative Uses for Cyanotype. Loveland, Colorado: Interweave Press, 1995.
Cyanotype, also called blueprinting, is an alternative photographic process. To create the cyanotype solution you can choose to buy:
Ingredients water 1 quart of warm water 2 ounces potassium ferricyanide 4 ounces ferric ammonium citrate tools gloves dust mask scale spoon mixing stick or spoon measuring cup drop cloth light proof bottle or light proof bag and thick sting funnel two plastic cups The Process
I can still remember the first time I tried to oil paint. My hand was so unsteady. I wasn't used to painting on an easel. As time passed, I learned different ways to hold the brush and support my arm and hand. I wear gloves while painting because I can be clumsy, sometimes dropping my brush, and the table easel tends to collapse, particularly if it is trying to support a large canvas. Painting has taught me patience. I painted this oil painting during four- hour sessions and in a cramped space. Sometimes I had to paint very close to the canvas as well to add details. I drew an outline of the still life on blank newspaper. This took time. In addition, I had to cover the back of the newspaper with graphite pencil. The graphite pencil served as a transfer medium. However, I transferred the drawing to a canvas quickly by simply going over it with a pencil. Early on, I traced over half of the bowl and glass to check if they were symmetrical. Also, toning the canvas (imprimatura) was easy. I used a rag or paint brush plus liquin to thin the paint. However, I now use walnut oil and walnut alkyd since neither are toxic. I devoted most of my time to observing colors in their many shades and the way the light produced shadows and highlights. I paid particular attention to hard, soft, and lost edges. When I finished for the day after I cleaned up, that's when I saw errors and had to wait to try to fix them the following day. This was frustrating because I wanted to fix them right away. But at least I had the opportunity to see the errors and try to improve the painting. Sometimes my drawings were good but when I painted over them, I added distortions. I don't know why this happened. I think when I paint I am not aware of everything that I should be observing. But in the end, I managed to create a decent piece. When considering a career in art, give some thought to what you have enjoyed doing in the past. If you have enjoyed experimenting with several media and techniques and like to show others, you might enjoy teaching. If you have spent hours creating with clay, you might enjoy a career in designing products. My advice is try as many media as you can. How do you know what you like until you have experienced it. Take foundation courses in drawing, 2-D design and 3-D design and expose yourself to museums, artist studios, and galleries. Ask an artist how they knew what you wanted to do for a living. Perhaps, they will tell you they have another job to support themselves if they are fine artists. Perhaps they just love to create works of art to show and sell. You may find you want a career in fine art but also want to complete a degree in digital art to have a better chance of finding work. The Bureau of Labor Statistics state that fine artists have a second job as a teacher or curator. The BLS also stated that artists held about 218,000 jobs in 2006. More than 6 out of 10 artists were self-employed. In contrast, artists held about 50,300 jobs in 2014. About half were self-employed. View the Occupational Outlook Handbook for information on craft and fine artists. Bureau of Labor Statistics, U.S. Department of Labor, Occupational Outlook Handbook, 2016-17 Edition, Craft and Fine Artists, on the Internet at http://www.bls.gov/ooh/arts-and-design/craft-and-fine-artists.htm (visited September 13, 2016). |
Diana Carol Clarke
Archives
December 2016
Categories
All
|